Auth
We are using Portunus, an opinionated and simple to use LDAP distribution, to manage our OpenLDAP server and DexIdp to offer OIDC. The upstream documentation complements this document. New services should use OAuth/OIDC if possible to lay the groundwork for SSO. If the application only support LDAP, that is also fine to use.
Introduction to LDAP
Please see the Portunus readme for a very good introduction to LDAP and how to connect your service to LDAP.
How to use it
See the Grafana configuration to see an example on how to use OAuth.
Some parts are also in the shared config, to make them available to Portunus and the targeted service (in this case Grafana).
To create a new application, edit the Dex configuration under services.portunus.dex in the Portunus MicroVM.
The application credentials are saved securely in sops.
For an exmaple LDAP configuration in Nix using the nixos-modules abstraction see the Gitea, Hydra or Mail. For the LDAP connection settings see the nixos-modules and the upstream documentation about the LDAP directory structure and Connecting services to Portunus.
For example:
- Host:
auth.serv.zentralwerk.org(changed to internal IP via/etc/hosts) - Port:
636 - Bind DN:
uid=search,ou=users,dc=c3d2,dc=de - User Search Base:
ou=users,dc=c3d2,dc=de - User Filter:
(&(&(objectclass=person)(isMemberOf=cn=gitea-users,ou=groups,dc=c3d2,dc=de))(|(uid=%s)(mail=%s))) - Admin Filter:
(&(objectclass=person)(isMemberOf=cn=gitea-admins,ou=groups,dc=c3d2,dc=de)) - Username Attribute:
uid - First Name Attribute:
givenName - Surname Attribute:
sn - Email Attribute:
mail - Public SSH Key Attribute:
sshPublicKey
New service accounts are seeded via services.portunus.seedSettings.users.
Backup and recovery using Restic
Backups are encrypted and done daily at around 4 am via restic to storage1 and offsite to a Hetzner storage box paid by sandro.
storage1 houses a restic-server protected by basic auth. When configuring a new host make sure that the restic repository password and the basic auth credentials for the restic server are different.
Restore is done easiest by mounting the backup with restic mount /mnt and then using rsync -a /mnt/snapshots/latest/path /path to copy the files from the latest snapshot back to their original place.
Disaster disk recovery
In case of possible critical data loss call a member of AG Infra and cooperate to minimize the risk of accidental mistakes.
When a disk is failing and already has several bad sectors in SMART, then it should be replaced ASAP. ZFS snapshots cannot be copied with zfs send/receive when they contain a bad sector and will abort when encountering them. A half send snapshot can be resumed but it is not useful and cannot be mounted. Because of that it is best to use ddrescue to the bare block device to get the data of the disk ASAP. ddrescue can copy to another block device or to a file. A map file should always be supllied!
ddrescue /dev/sdx1 /dev/sdz1 /map
or
ddrescue /dev/sdx1 /disk.img /map
After that rsync can be used to copy the data of the bad file system. If there are bad blocks, some files cannot be copied/recovered. They need to be recovered via other methods.
Rsync should be run with the following arguments: rsync -a --info=progress2 /mnt/old /mnt/new
Baremetal
File system setup
Set the disko options for the machine and run:
$(nix --extra-experimental-features "flakes nix-command" build --print-out-paths --no-link -L '.#nixosConfigurations.HOSTNAME.config.system.build.diskoScript')
When adding new disks the paths under /dev/disk/by-id/ should be used, so that the script is idempotent across device restarts.
Install new server
- Copy the nix files from an existing, similar host.
- Disable all secrets until after the installation is finished.
- Set
simd.archoption to the output ofnix --extra-experimental-features "flakes nix-command" shell nixpkgs#gcc -c gcc -march=native -Q --help=target | grep marchand update the comment next to it- If that returns
x86_64search on a search engine for theark.intel.comentry for the processor which can be found by catting/proc/cpuinfo
- If that returns
- Generate
networking.hostIdwithhead -c4 /dev/urandom | od -A none -t x4according to the options description. - Boot live ISO
- If your ssh key is not baked into the iso, set a password for the
nixoswith passwd to be able to log in over ssh.
- If your ssh key is not baked into the iso, set a password for the
rsyncthe this directory into the live system.- Stop the raid if one booted up
mdadm --stop /dev/md126 - generate and apply disk layout with disko (see above).
- Generate
hardware-configuration.nixwithsudo nixos-generate-config --root /mnt.- If luks disks should be decrypted in initrd over ssh then:
- Make sure
boot.initrd.luks.devices.*.devicesis set. - Enable
boot.initrd.network.enable - Add the required kernel modules, which can be found with
lshw -C network(look fordriver=), for the network interfaces in initrd toboot.initrd.availableKernelModules.
- Make sure
- If luks disks should be decrypted in initrd over ssh then:
- Install nixos system with
sudo nixos-install --root /mnt --no-channel-copy --flake .#HOSTNAME. - After a reboot add the age key to sops-nix with
nix shell nixpkgs#ssh-to-ageandssh-to-age < /etc/ssh/ssh_host_ed25519_key.pub. - Add
/etc/machine-idand luks password to sops secrets. - Enable and deploy secrets again.
- Improve new machine setup by automating easy to automate steps and document others.
- Commit everything and push
Unlocking LUKs encrypted disks remotely
- Connect per ssh to the server as root and with port 4748 eg:
shh root@server9.cluster.zentralwerk.org -p 4748It is recommended to write the following into yourssh_configfor each server:Host server09-unlock Hostname server9.cluster.zentralwerk.org IdentityFile ~/.ssh/id_ed25519 Port 4748 PubkeyAuthentication yes User root - If the password prompt unexpectedly closes in the initrd shell or the boot process doesn't start within a few seconds after entering all disk passwords run:
systemctl start default.target - You'll find the passwords in the hosts sops file, eg:
sops hosts/server10/secrets.yaml
C3D2 infrastructure based on NixOS
Online version at https://docs.zentralwerk.org
Further documentation
Helpful tools
- Status page - Matrix Alert Channel
- NixOS option search
- Code search (including Nix repos we use)
Laptops / Desktops
This repo could be used in the past as a module. While still technically possible, it is not recommended because the amounts of flake inputs highly increased and the modules are not designed with that in mind.
For end user modules take a look at the c3d2-user-module.
For the deployment options take a look at deployment.
Use flake inputs
nixpkgs/nixos
The nixpkgs/nixos input used lives at https://github.com/NuschtOS/nuschtpkgs/tree/backports-25.05. We are using a fork managed by sandro to make backports, cherry-picks and custom fixes dead easy. If you want to have an additional backport, cherry-pick or other change, please contact sandro.
nixos-modules repo
The nixos-modules repo lives at https://github.com/NuschtOS/nixos-modules and is mirrored to https://gitea.c3d2.de/c3d2/nixos-modules. Auto generated documentation about all options is available at https://nuschtos.github.io/nixos-modules/. It contains options sandro shares between his private nixos configs and the C3D2 one and which others also started to use. It sets many options by default and when searching for a particular setting you should always grep this repo, too. In question ask sandro and consider improving the documentation about this with comments and readme explanations. Something should be changed/added/removed/etc? Please create a PR or start a conversations with your ideas.
SSH access
If people should get root access to all machines, their keys should be added to ssh-public-keys.nix.
Deployment
Deploy to a remote NixOS system
For every host that has a nixosConfiguration in our Flake, there are two scripts that can be run for deployment via ssh.
-
nix run .#HOSTNAME-nixos-rebuild switchCopies the current state to build on the target system. This may fail due to resource limits on e.g.: Raspberry Pis.
-
nix run .#HOSTNAME-nixos-rebuild-local switchBuilds everything locally, then uses
nix copyto transfer the new NixOS system to the target.To use the cache from hydra set the following nix options similar to enabling flakes:
trusted-public-keys = hydra.hq.c3d2.de:KZRGGnwOYzys6pxgM8jlur36RmkJQ/y8y62e52fj1ps=
extra-substituters = https://hydra.hq.c3d2.de
This can also be set with the
c3d2.addBinaryCacheoption from the c3d2-user-module.
Checking for updates
nix run .#list-upgradable
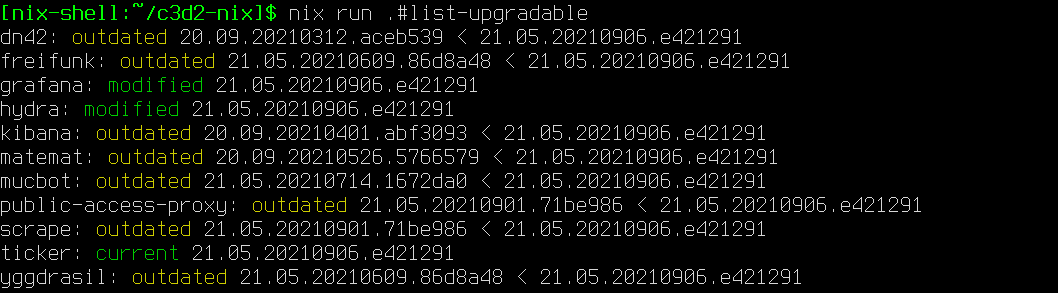
Checks all hosts with a nixosConfiguration in flake.nix.
Update from Hydra build
The fastest way to update a system, a manual alternative to setting
c3d2.autoUpdate.enable = true;
Just run:
update-from-hydra
Deploy a MicroVM
Build a microvm remotely and deploy:
nix run .#microvm-update-HOSTNAME
Build MicroVM locally and deploy:
nix run .#microvm-update-HOSTNAME-local
Update MicroVM from our Hydra
Our Hydra runs nix flake update daily in the updater.timer,
pushing it to the flake-update branch so that it can build fresh
systems. This branch is setup as the source flake in all the MicroVMs,
so the following is all that is needed on a MicroVM-hosting server:
microvm -Ru $hostname
Secrets management
How to add a new host
Edit .sops.yaml:
- Add an AGE key for this host. Comments in this file tell you how to do it.
- Add a
creation_rulessection forhost/$host/*.yamlfiles
Edit a secret
Edit .sops.yaml to add files for a new host and its SSH pubkey.
# Get sops
nix develop
# Decrypt, start EDITOR, encrypt
sops hosts/.../secrets.yaml
DNS & Domains
DNS
Currently there are two primary DNS servers, ns.c3d2.de deployed from this directory with its zone config located in the dns repository and dns.serv.zentralwerk.org with its mostly auto generated config managed in the network repository. There are two secondary DNS servers: ns1.supersandro.de managed by Sandro and ns.spaceboyz.net managed by Astro. The managed zones are synced through catalog zones, so zone edits, additions or removals can be done without requiring any interaction from the secondary servers and any changes are usually propagated within a few seconds.
DNSSEC
To get the DNSKEY and DS record ssh into the VM and run the following commands:
$ keymgr c3d2.de dnskey
$ keymgr c3d2.de ds
Note for INWX: Their website requires to add an IN between the domain name and record type.
Domains
Please see this wiki page for a list of domains and their owner.
FTP-Server
How to copy/delete/move a file to ftp?
The domain to connect to is ftp.serv.zentralwerk.org on port 22. Connecting directly to ftp.c3d2.de does not work and you will end up on the public-access-proxy.
The server only offers sftp.
scp -i ~/.ssh/id_ed25519 file ftpupload@ftp.serv.zentralwerk.org:/var/www/
How to shutdown
This guide describe how to shutdown the HQ when there is a planned maintenance on the power.
- Turn off Pipebert and Glotzbert
- Turn off the printer
- Power off all servers like Hydra, Server10 and Storage1
- Power off coloradio by holding the power button for 4 seconds
- Power off server2 and then server1
- Unplug all 4 power cords behind the rack and lay them into the rack
- Take out the fuse for "Netzwerkschrank" in HQ. At the time of writing this is F2 but double check this!
Hydra
We use Hydra to build and cache all our NixOS configurations. This is necessary in addition to the official cache, as we have some custom projects which are not in nixpkgs and some packages use custom patches/overrides.
The jobset for this repo can be found at https://hydra.hq.c3d2.de/jobset/c3d2/nix-config#tabs-jobs.
Hyp1
IPMI
| Name | Value |
|---|---|
| URL | https://hyp1-ipmi.mgmt.zentralwerk.org |
| Credentials | see in the secrets |
IPMI License
https://github.com/zsrv/supermicro-product-key
RAID controller
There is a raid controller for the front 3.5 inch SATA disks. They are currently unused.
Hyp2
IPMI
| Name | Value |
|---|---|
| URL | https://hyp2-ipmi.mgmt.zentralwerk.org |
| Credentials | see in the secrets |
IPMI License
https://github.com/zsrv/supermicro-product-key
RAID controller
There is a raid controller for the front 3.5 inch SATA disks. They are currently unused.
Hyp3
IPMI
| Name | Value |
|---|---|
| URL | https://hyp3-ipmi.mgmt.zentralwerk.org |
| Credentials | see in the secrets |
IPMI License
https://github.com/zsrv/supermicro-product-key
RAID controller
There is a raid controller for the front 3.5 inch SATA disks. They are currently unused.
Mail can be accessed and send via either the web interface available at https://mail.c3d2.de or any standard E-Mail client.
Client configuration
Please see the below configuration. Access via POP3 is not recommended and without TLS is not available.
Server
- Server:
mail.flpk.zentralwerk.org - Username: Username (with or without Domain)
- Password: LDAP Password
IMAP
- Port: 993
- Security: TLS
- Auth type: Password
SMTP
- Port: 465
- Security: TLS
- Auth type: Password
Mailman list configuration
It is very, very (!) important to set the in DMARC Mitigations DMARC mitigation action to Replace From: with list address and DMARC Mitigate unconditionally to yes as otherwise mails cannot be delivered reliable to everywhere when Mailman's ARC signing is bugging out again.
MediaGoblin
Reprocess failed media
MediaGoblin is not a very robust software and some media might fail processing because of issues in the module we wrote or other things.
To reprocess them run the following command: mediagoblin-gmg reprocess initial
Delete media
If it is for whatever reason necessary to delete media, this can be done with mediagoblin-gmg deletemedia 774.
MediaWiki
How to update
If MediaWiki is updated, the composer.lock needs to be updated, too.
This can be done by running the following commands
nix build .#nixosConfigurations.mediawiki.config.services.mediawiki.package.src
cp --no-preserve=all result/composer.json .
composer update
and then updating the vendorHash by trying to deploy once.
MicroVM
Migrating MicroVMs
Migrating a MicroVM is a simple and complex task at the same time.
The steps are roughly like:
- Turn off MicroVM
- Transfer datasets with:
syncoid --sendoptions=c --recursive --preserve-properties server9-storage/microvms/gancio root@storage1.cluster.zentralwerk.org:storage1-ssd-microvm/data/microvms/gancio
- Change
c3d2.deployment.server - Deploy MicroVM
- Verify if data is complete and everything is functioning
- Deploy both MicroVM hosts to update the auto start systemd units
Pipebert
The recommended way to play music is the c3d2-user-module NixOS module.
Public Access Proxy
We are using Haproxy to do SNI-based forwarding without opening the TLS connection.
How to add a domain?
To proxy a new domain, it should be added to services.proxy.proxyHosts.
| Option | Usage |
|---|---|
hostNames | A list of domain(s) that should be proxied |
proxyTo.host | The IP it should be proxied to |
proxyTo.httpPort | The http port to proxy to, defaults to 80 |
proxyTo.httpsPort | The http port to proxy to, defaults to 443 |
proxyTo.proxyHttpPort | The http proxy protocol port to proxy to, defaults to 8080 |
proxyTo.proxyHttpsPort | The http proxy protocol port to proxy to, defaults to 8443 |
proxyProtocol | If the web server we are proxying to, talks proxy protocol. Please make sure, to do IP filtering. See []services.nginx.commonServerConfig](../../modules/nginx.nix). |
matchArg | Optional arguments to HAProxy req.ssl_sni -i |
How to forward a port?
This is done in the network repo, to be exact in the site.hosts.upstream4.forwardPorts option.
Storage1
IPMI
| Name | Value |
|---|---|
| URL | https://storage1-ipmi.mgmt.zentralwerk.org |
| Credentials | see vaultwarden |
RAID controller
To access the disks via smartctl use: smartctl -a -d megaraid,5 /dev/sdp.
ISM
Website https://linux.dell.com/repo/hardware/ism/
- Get current Dockerfile:
wget https://linux.dell.com/repo/hardware/ISM_5400/os_dependent/ism_docker/Dockerfile -O Dockerfile - Re-apply our patches to reduce layer sizes
- Update aliases file:
echo -e "$(curl https://linux.dell.com/repo/hardware/ISM_5400/os_dependent/ism_docker/dellism_aliases.sh)" | sed -e 's|dell_ism_$ISM_VERSION|gitea.c3d2.de/c3d2/ism_5400:latest|g' -e 's|$PLATFORM|podman|g' > dellism_aliases.sh podman build -t gitea.c3d2.de/c3d2/ism_5400 .podman push gitea.c3d2.de/c3d2/ism_5400
libvirtd
The connection string for virsh is: qemu+ssh://root@storage1.cluster.zentralwerk.org/system.
If you want to use a GUI instead, virt-manager is a good option. You can connect under File > Add Connection.
Then choose QEMU/KVM as the Hypervisor, connect via ssh, root as username and storage1.cluster.zentralwerk.org as host and click Connect.
VMs and their payload must be configured to be reboot safe. The host will reboot from time to time and no special attention will be paid to libvirt VMs. This means using encrypted volumes inside the VM is not feasible as it conflicts with being reboot safe, but it also has worse performance as the host level disks are already encrypted with LUKS and us on top of that ZFS. Also ISOs should be unmounted after the host installation is done as they might be garbage collected later and VMs referencing ISOs paths that do not exist prevent the boot of the VM.
Supermicro Incus Cluster
Installation
0. Create the IP addresses in the network repo for following subnets
- cluster for the server
- mgmt for the server and the ipmi
1. Update the network flake input
nix flake lock --update-input zentralwerk --commit-lock-file
2. Create an provisioner ISO that starts the a NixOS live system in the 192.168.40.32/27 subnet and flash it on a USB that permanently stays with the server
nix build .#nixosConfigurations.provisioner.config.system.build.isoImage -L
3. Create the NixOS host
In this guide: hyp{1,2,3}
Generate the config files with the UUIDs and hostIDs. This step could be automated by a script that write a file containing these public values.
4. Get the drivers for the network card
- add the result to modules/baremetal.nix
readlink -f /sys/class/net/\*/device/driver | xargs -I{} basename {}- TODO: this step could be automated
5. Create sops permissions with dummy age key for the host
Add sections to the .sops.yaml
6. Create the passwords.
HOSTNAME=hyp1 nix run .#supermicro-incus-create-passwords
7. Configure IPMI access
PROVISION_IP=192.168.40.33 IPMI_GATEWAY_IP_ADDRESS=10.0.0.254 IPMI_HOSTNAME=hyp1-ipmi.mgmt.zentralwerk.org HOSTNAME=hyp1 nix run .#supermicro-deploy-ipmi
8. Find SSD /dev/disk/by-id/, erase SSDs, partition disks and install
HOSTNAME=hyp1 nix run .#supermicro-deploy-disko
ssh root@192.168.40.33 reboot
9. Unlock disks
nix run .#supermicro-unlock-hyp1
10. Rotate age keys and enroll passwords with userborn
HOSTNAME=hyp1 nix run .#supermicro-enroll-sops
Incus Cluster Setup
Start incus on one bootstrapping server (hyp1).
Create joining token with incus cluster add HOSTNAME for the other cluster members.
Add this value to the config option c3d2.supermicro-incus-cluster.clusterToken.
Deploy the new members: nix run .#hyp2-nixos-rebuild switch and nix run .#hyp3-nixos-rebuild switch
Stop the incus daemon on hyp1.
Remove the bootstrap server on one of the others: incus cluster remove --force hyp1.
Remove the /var/lib/incus/ files on hyp1.
Add the server back again incus cluster add HOSTNAME with a join token.
Run nix run .#supermicro-incus-set-core-address to setup the split network (rest api and internal api is split) and restart incus on all nodes.
The ACME certs get renewed daily or when config parameters change.
This does no happen when we use the preseed with acme settings.
If the ACME certs has not been enrolled yet, change the acme configuration and enroll the cert.
incus config set acme.ca_url https://acme-staging-v02.api.letsencrypt.org/directory followed by incus config set acme.ca_url https://acme-v02.api.letsencrypt.org/directory
Run nix run .#supermicro-incus-create-local-storage-pool to create the required local storage pools on all members.
Creating Cluster Tokens
TODO
Incus Cluster Software Defined Storage Integration
TODO
Bootstrapping services that are outside the cluster
- dns
- vaultwarden
- minio (S3 Bucket for Incus and Helm)
- woodpecker agents
- ingress proxy
- gitea
- auth
TODOs
These services should be either synced between the cluster and the non cluster servers or should be run on both to ensure a seamless cluster recovery process
- S3 syncing from rook and minio for recovery critical services
- dns cache now has include for local routes from secondaries
- Automatically populate passwords from SOPS into vaultwarden. The admin will have the passwords saved in a local browser extension.
- Replicated VMs for woodpecker agents on all cluster members
- Replicated VMs for round robin ingress proxy on all cluster members
- gitea ??
- auth ??
provisioner-network
Minimal host with SSH keys and DHCP network setup in the provision vlan.